Basic Functionality
Loading data
There are two ways to load data into a Puggle Dataset: from file(s), or programatically in Python.
Loading from files
Here is an example of loading in a set of annotations from a machine learning model, and combining those annotations with a structured CSV dataset.
First, import puggle and create an empty Dataset:
from puggle import Dataset
d = Dataset()
Then you can use the load_documents function to load a list of documents from a CSV file and a JSON file. Your structured data should be stored in the csv, and your annotations (e.g. the output of a machine learning model such as SPERT) should be stored in the JSON file.
d.load_documents(
    sd_filename="sample_data/documents.csv",
    anns_filename="sample_data/annotations.json",
    anns_format="spert",
)
Valid anns_format options are currently quickgraph and spert. Specifying a format is necessary because each of these formats differ slightly - for example, Quickgraph stores relationships differently, and uses a label key for its relations rather than type.
See Data Format Requirements for more information on the required data formats.
Creating documents programatically
You can also create a dataset and populate it programatically. Here is an example of creating the same Dataset as above, but fully in Python.
Note that your data will need to adhere to the format below. At this stage the ability to read either quickgraph or spert formats are limited to the load_documents function.
from puggle import Dataset, Document, Annotation

d = Dataset()

f1 = {"text": "one three two", "date": "12/05/2020", "x": "4", "y": "test"}
a1 = Annotation.from_dict(
    {
        "tokens": ["one", "three", "two"],
        "entities": [
            {"start": 0, "end": 1, "labels": ["number"]},
            {"start": 1, "end": 2, "labels": ["number"]},
            {"start": 2, "end": 3, "labels": ["number"]},
        ],
        "relations": [
            {"start": 1, "end": 0, "type": "bigger_than"},
            {"start": 1, "end": 2, "type": "bigger_than"},
        ],
    }
)

doc1 = Document(f1, a1)
d.add_document(doc1)

f2 = {"text": "four six five", "date": "04/05/2020", "x": "12", "y": "another"}
a2 = Annotation.from_dict(
    {
        "tokens": ["four", "six", "five"],
        "entities": [
            {"start": 0, "end": 1, "labels": ["number"]},
            {"start": 1, "end": 2, "labels": ["number"]},
            {"start": 2, "end": 3, "labels": ["number"]},
        ],
        "relations": [
            {"start": 1, "end": 0, "type": "bigger_than"},
            {"start": 1, "end": 2, "type": "bigger_than"},
        ],
    }
)

doc2 = Document(f2, a2)
d.add_document(doc2)
Note that we call the from_dict function in the Annotation class to convert the dictionary into an Annotation object. We can then include the fields (dictionary) and this Annotation object as arguments to the constructor of the Document class, then add this newly-created Document object to our dataset.
Loading your data into Neo4j automatically
Once they are loaded, you can use the load_into_neo4j function to automatically create a Neo4j graph:
d.load_into_neo4j(recreate=True)
The recreate=True causes the graph to be recreated from scratch.
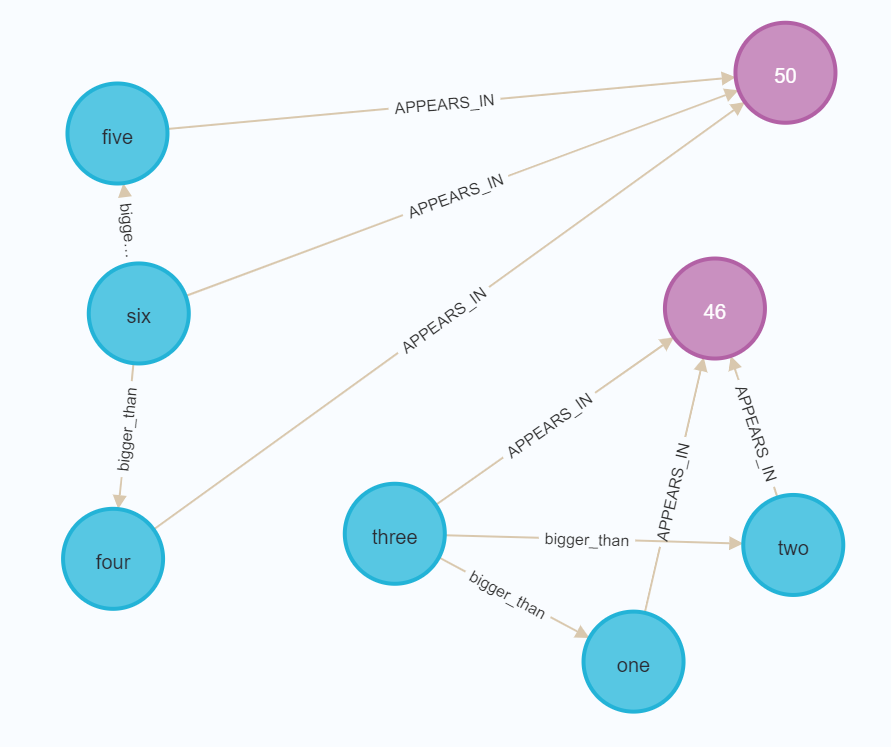
You can then open up the Neo4j browser and write queries over your documents/entities/relationships. For example, here is what it looks like when running MATCH (n) RETURN n on the sample data:
Saving data
The Dataset’s save_to_file() function allows you to save your dataset to one of two formats: json or quickgraph.
The json format simply dumps each document into a JSON object. An example of one document from the json output format is as follows:
{
    "fields": null,
    "annotations": {
      "tokens": [
        "<id>",
        "air",
        "freight",
        "for",
        "pump",
        "TBC"
      ],
      "mentions": [
        {
          "start": 4,
          "end": 5,
          "tokens": [
            "pump"
          ],
          "labels": [
            "PhysicalObject"
          ]
        },
        {
          "start": 1,
          "end": 3,
          "tokens": [
            "air",
            "freight"
          ],
          "labels": [
            "Activity"
          ]
        }
      ],
      "relations": [
        {
          "start": 1,
          "end": 0,
          "type": "hasParticipant"
        }
      ]
    }
}
The quickgraph output can be fed directly into QuickGraph to use for creating a preannotated project (see here). An example output of that same document with the quickgraph format is as follows:
{
    "original": "<id> air freight for pump TBC",
    "tokens": [
      "<id>",
      "air",
      "freight",
      "for",
      "pump",
      "TBC"
    ],
    "entities": [
      {
        "id": "1",
        "start": 4,
        "end": 4,
        "label": "PhysicalObject"
      },
      {
        "id": "2",
        "start": 1,
        "end": 2,
        "label": "Activity"
      }
    ],
    "relations": [
      {
        "source_id": "2",
        "target_id": "1",
        "label": "hasParticipant"
      }
    ]
}
Note that the end indexes in the quickgraph output are 1 higher than that of the json output - this is by design (QuickGraph’s end indexes are the index of the last word in the mention).
An example of using the save_to_file() is as follows:
d.save_to_file('output.json', 'quickgraph')
Manipulating a Dataset
Puggle also contains functions for manipulating a dataset, for example:
drop_entity_class()removes all instances of the given entity class from a dataset (and all relations connected to it).drop_relation_class()removes all instances of the given relation class from a dataset.convert_entity_class()converts all entities with the given class to another class.convert_relation_class()converts all relations with the given class to another class.split_sentences()creates a new Dataset by splitting the sentences of the given Dataset based on a delimiter (such as a full stop).
For more info, see the API Reference.
Statistical functions
There are a few statistical functions:
get_unique_tokens_count()returns the number of unique tokens in the dataset.get_entity_label_counts()returns a sorted list of (entity class, frequency) pairs appearing in the dataset.
For more info, see the API Reference.
Sampling
We have also provided some functions for generating a sample from a dataset. This can be used for things such as creating a “test set” with which to validate a model. At the moment there are two functions:
random_sample()returns a random sample of the dataset with the given number of documents.smart_sample()attempts to generate a sample of the dataset that maximises the number of unique tokens, entity classes, and relation classes. This function is still experimental at this stage.
For more info, see the API Reference.